Code, Draw, Deploy: A drawing app with Nuxt & Cloudflare R2
Introduction
I won't go into each detail of the code, but I'll try to explain the main concepts and how to build a drawing app with Nuxt and Cloudflare R2.
Atidraw is a web application that lets you create and share your drawings with the world. Our app uses OAuth for user authentication and Cloudflare R2 to store and list drawings.
The application runs with server-side rendering on the edge using Cloudflare Pages on the Workers free plan.
Project Dependencies
Our Nuxt application uses the following dependencies:
nuxt-auth-utilsfor user authenticationsignature_padfor the drawing canvas@nuxt/uifor the UI components@nuxthub/corefor a zero config experience with Cloudflare R2
In our nuxt.config.ts we need to enable the following modules and options:
export default defineNuxtConfig({
  modules: [
    '@nuxthub/core',
    '@nuxt/ui',
    'nuxt-auth-utils'
  ],
  hub: {
    // Enable Cloudflare R2 storage
    blob: true
  },
})
blob option will use Cloudflare platform proxy in development and automatically create a Cloudflare R2 bucket for your project when you deploy it. It also provides helpers to upload and list files.future.compatibilityVersion: 4 option to leverage the new directory structure.User Authentication
For user authentication, we'll use nuxt-auth-utils. It provides functions to authenticate users with OAuth providers and stores the user session in encrypted cookies.
First, we need to set up a session secret (used to encrypt & decrypt the session cookie) and our OAuth application credentials in the .env file:
NUXT_SESSION_PASSWORD=our_session_secret
NUXT_OAUTH_GITHUB_CLIENT_ID=our_github_client_id
NUXT_OAUTH_GITHUB_CLIENT_SECRET=our_github_client_secret
Then, create a server route to handle the OAuth callback in server/auth/github.get.ts:
export default oauthGitHubEventHandler({
  async onSuccess(event, { user }) {
    await setUserSession(event, {
      user: {
        provider: 'github',
        id: String(user.id),
        name: user.name || user.login,
        avatar: user.avatar_url,
        url: user.html_url,
      },
    })

    return sendRedirect(event, '/draw')
  },
})
.get.ts suffix indicates that only GET requests will be handled by this route.When the user hits /auth/github:
oauthGitHubEventHandlerredirects the user to the GitHub OAuth page- The user is then redirected back to /auth/github
onSuccess()is called and the user session is set in a cookie- The user is finally redirected to /draw
In app/pages/draw.vue, we can leverage useUserSession() to know if the user is authenticated or not.
<script setup lang="ts">
const { loggedIn } = useUserSession()
// ...
</script>

<template>
  <DrawPad v-if="loggedIn" @save="save" />
  <UButton v-else to="/auth/github" label="Sign-in with GitHub" external />
</template>
As we use TypeScript, we can type the session object to get autocompletion and type checking by creating a types/auth.d.ts file:
declare module '#auth-utils' {
  interface User {
    provider: 'github' | 'google'
    id: string
    name: string
    avatar: string
    url: string
  }
}
// export is required to avoid type errors
export {}
Drawing Canvas
For the drawing interface, we'll use the signature_pad library and create a new component in components/DrawPad.vue:
<script setup lang="ts">
import SignaturePad from 'signature_pad'

const emit = defineEmits(['save'])
const canvas = ref()
const signaturePad = ref()

onMounted(() => {
  signaturePad.value = new SignaturePad(canvas.value, {
    penColor: '#030712',
    backgroundColor: '#f9fafb',
  })
})

async function save() {
  const dataURL = signaturePad.value.toDataURL('image/jpeg')
  // Emit the dataURL to the parent component
  emit('save', dataURL)
}
</script>

<template>
  <div class="max-w-[400px]">
    <canvas ref="canvas" class="border rounded-md" />
    <UButton @click="save" />
  </div>
</template>
Upload Drawings
In the app/pages/draw.vue page, we need to upload the drawing to our Cloudflare R2 bucket.
For this, we want to convert the dataURL we receive from the drawing canvas to a Blob, then the Blob to a File to specify the file type and name.
Finally we create a FormData object with the file and upload it to the /api/upload API route.
<script setup lang="ts">
const { loggedIn } = useUserSession()

async function save(dataURL: string) {
  // Transform the dataURL to a Blob
  const blob = await fetch(dataURL).then(res => res.blob())
  // Transform the Blob to a File
  const file = new File([blob], `drawing.jpg`, { type: 'image/jpeg' })
  // Create the form data
  const form = new FormData()
  form.append('drawing', file)

  // Upload the file to the server
  await $fetch('/api/upload', {
    method: 'POST',
    body: form
  })
    .then(() => navigateTo('/'))
    .catch((err) => alert(err.data?.message || err.message))
}
</script>

<template>
  <DrawPad v-if="loggedIn" @save="save" />
  <!-- ... -->
</template>
Let's create the API route to store the drawing in the Cloudflare R2 bucket:
export default eventHandler(async (event) => {
  // Make sure the user is authenticated to upload
  const { user } = await requireUserSession(event)

  // Read the form data
  const form = await readFormData(event)
  const drawing = form.get('drawing') as File

  // Ensure the file is a jpeg image and is not larger than 1MB
  ensureBlob(drawing, {
    maxSize: '1MB',
    types: ['image/jpeg'],
  })

  // Upload the file to the Cloudflare R2 bucket
  return hubBlob().put(`${Date.now()}.jpg`, drawing, {
    addRandomSuffix: true,
    customMetadata: {
      userProvider: user.provider,
      userId: user.id,
      userName: user.name,
      userAvatar: user.avatar,
      userUrl: user.url,
    },
  })
})
requireUserSession() function is provided by nuxt-auth-utils and will throw a 401 error if the user is not authenticated.As you can see, we don't need a database as we store the user metadata in the Cloudflare R2 bucket custom metadata.
hubBlob() server function to work with the Cloudflare R2 bucket.List Drawings
It's time to list our user drawings! First, however, we need to create a new API route in server/api/drawings.get.ts:
export default eventHandler(async (event) => {
  // Return 100 last drawings
  return hubBlob().list({
    limit: 100
  })
})
Then, we'll create a new page in app/pages/index.vue to list the drawings:
<script setup lang="ts">
const { data } = await useFetch('/api/drawings')
</script>

<template>
  <div class="grid grid-cols-1 sm:grid-cols-2 lg:grid-cols-3 xl:grid-cols-4 gap-8">
    <div v-for="drawing in data?.blobs" :key="drawing.pathname" class="flex flex-col gap-2">
      <img :src="`/drawings/${drawing.pathname}`" :alt="drawing.pathname" />
      <div class="flex items-center justify-between">
        <span>{{ drawing.customMetadata?.userName }}</span>
        <span class="text-xs text-gray-500">{{ drawing.uploadedAt }}</span>
      </div>
    </div>
  </div>
</template>
Drawings Order
You may have noticed that the last drawing is displayed last, this is because Cloudflare R2 is using alphabetical order to list the files and we use the timestamp (using Date.now()) as the file name. Also, R2 doesn't support listing files with a custom order.
Even though it's easy to add a Cloudflare D1 database with hubDatabase(), I wanted to keep this example as simple as possible.
Instead, I had the idea to use the timestamp in 2050 minus the timestamp of the drawing to get a descending order. It's not perfect but it works, until 2050, it's still a long time 😄.
Let's update our /api/upload route to update the filename:
export default eventHandler(async (event) => {
  // ...

  /**
   * Create a new pathname to be smaller than the last one uploaded
   * So the blob listing will send the last uploaded image at first
   * We use the timestamp in 2050 minus the current timestamp
   * So this project will start to be buggy in 2050, sorry for that
   **/
  const name = `${new Date('2050-01-01').getTime() - Date.now()}`

  // Upload the file to the Cloudflare R2 bucket
  return hubBlob().put(`${name}.jpg`, drawing, {
    // ...
  })
})
We now have our last drawing uploaded at the top of our listing 🚀
Drawings Pagination
What if we have more than 100 drawings? We need to add pagination to our listing.
The hubBlob().list() accepts a cursor parameter to paginate the results.
Let's update our API route to support pagination with a cursor query parameter:
export default eventHandler(async (event) => {
  const { cursor } = await getQuery<{ cursor?: string }>(event)

  return hubBlob().list({
    limit: 100,
    cursor
  })
})
The API route returns a BlobListResult object with a cursor and hasMore properties:
interface BlobListResult {
  blobs: BlobObject[]
  hasMore: boolean
  cursor?: string
  folders?: string[]
}
The returned cursor value is used to get the next page of drawings (if hasMore is true).
We can use VueUse vInfiniteScroll directive to create an infinite scroll to load more drawings.
<script setup lang="ts">
import { vInfiniteScroll } from '@vueuse/components'

const loading = ref(false)
const { data } = await useFetch('/api/drawings', {
  // don't return a shallowRef as we mutate the array in loadMore()
  deep: true,
})

async function loadMore() {
  if (loading.value || !data.value?.hasMore) return
  loading.value = true

  const more = await $fetch(`/api/drawings`, {
    query: { cursor: data.value.cursor },
  })
  data.value.blobs.push(...more.blobs)
  data.value.cursor = more.cursor
  data.value.hasMore = more.hasMore
  loading.value = false
}
</script>


<template>
  <div class="my-8">
    <!-- ... -->
    <div v-if="data?.hasMore" v-infinite-scroll="[loadMore, { distance: 10, interval: 1000 }]">
      <UButton :loading="loading" @click="loadMore">
        {{ loading ? 'Loading more drawings...' : 'Load more drawings' }}
      </UButton>
    </div>
  </div>
</template>
We now have a pagination system that loads more drawings when the user scrolls to the bottom of the page.
Deploying the App
You can host your drawing application on a free Cloudflare account and free NuxtHub account.
All you have to do is to run one single command:
npx nuxthub deploy
This command will:
- Build your Nuxt application
- Create a new Cloudflare Pages project on your Cloudflare account
- Provision a Cloudflare R2 bucket
- Deploy your application
- Provide you with a URL to access your application with a free
<your-app>.nuxt.devdomain.
If you prefer, you can also deploy this project using the NuxtHub Admin by clicking on the button below:
Remote Storage
Once your project is deployed, you can use NuxtHub Remote Storage to connect to your preview or production Cloudflare R2 bucket in development using the --remote flag:
npx nuxt dev --remote
Manage Drawings
Some users may draw inappropriate drawings that we may want to remove. For this, NuxtHub provides a Blob panel in both the Nuxt DevTools and the NuxtHub Admin.
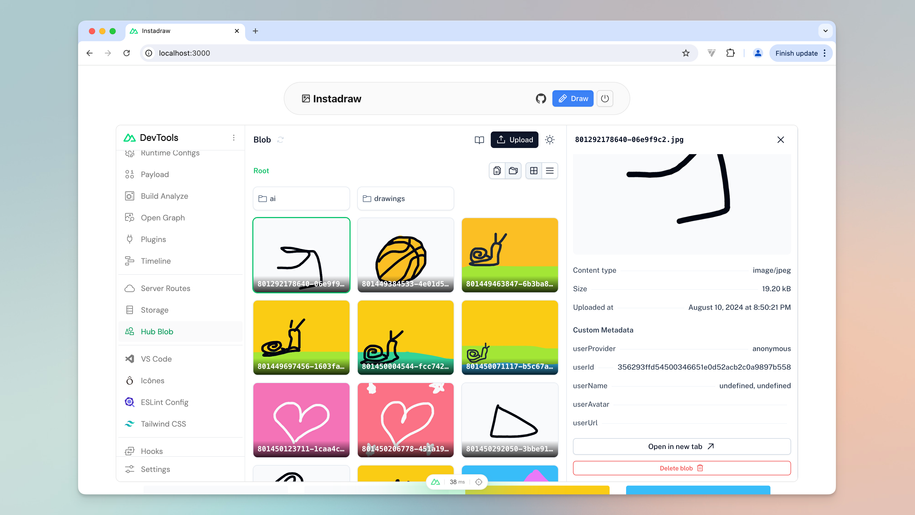
Development
When running your project locally, you can open the Nuxt DevTools:
Shift + Option + Dshortcut or clicking on the Nuxt logo in the botttom of the screen- The look for the Hub Blob tab (you can also use
CTRL + Kto open the search bar and typeBlob)
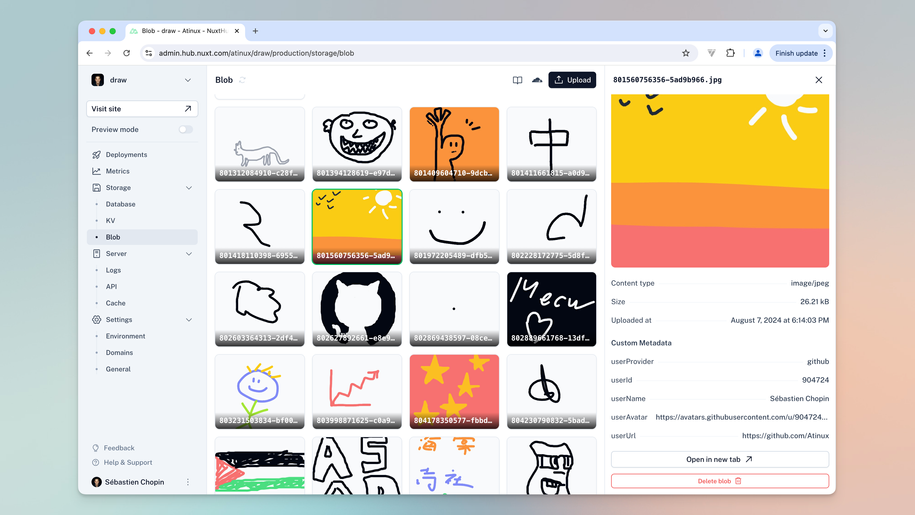
Production
You can manage all the drawings using the Blob panel in the NuxtHub Admin.
Once deployed, open the admin panel of your application with:
npx nuxthub manage
Or go to https://admin.hub.nuxt.com and select your project.
Conclusion
Congratulations! You've now built a fully functional drawing application using Nuxt and Cloudflare R2 for storage. Users can create drawings, save them to the cloud, and access them from anywhere.
Feel free to expand on this foundation and add your own unique features to make Atidraw yours!
Checkout the next article on how to leverage Cloudflare AI to generate the alternative text for the user drawings (accessibility & SEO) as well as generating an alternative drawing using AI: Cloudflare AI for User Experience.
Start with NuxtHub today
Using Cloudflare AI Models for User Experience
Learn how I leverage Cloudflare AI models in Nuxt to improve my drawing app accessibility, SEO and User Experience.
Introducing NuxtHub Beta
We are excited to announce the beta release of NuxtHub, a new way to build full-stack Nuxt applications globally with zero configuration.