Using Cloudflare AI Models for User Experience
Introduction
Let's improve Atidraw, an open source collaborative drawing app made with Nuxt.
The application has basic features such as:
- Authentication with Google, GitHub or login anonymously based on
nuxt-auth-utils - Drawing with
signature_pad - Upload and store drawings with Cloudflare R2 using
hubBlob()
You can play with it on draw.nuxt.dev.
Cloudflare AI Pricing
This is important to know how Cloudflare AI models are billed.
Cloudflare free allocation allows anyone to use a total of 10,000 Neurons per day at no charge.
Neurons are Cloudflare's way of measuring AI outputs across different models. To give you a sense of what you can accomplish with 10,000 Neurons, you can generate one of the following (or an equivalent mix):
- 100-200 LLM responses
- 500 translations
- 500 seconds of speech-to-text audio
- 10,000 text classifications
- 1,500 - 15,000 embeddings
Once you reach the free allocation, you can use the AI models with a pay-as-you-go model of $0.011 / 1,000 Neurons.
Add AI to Nuxt
To add AI to our Nuxt application, we need to enable the AI feature in our nuxt.config.ts file.
export default defineNuxtConfig({
  hub: {
    ai: true, // <--- Enable AI
    blob: true,
  }
})
Then, we want to make sure our project is linked to our NuxtHub account.
npx nuxthub link
hubAI().I've been thinking about two features:
- Generate the alternative text for the user drawings, improving the accessibility of the application & SEO.
- Generate an image based on the drawing and the alternative text, as a way to make the application more interactive.
Before starting, I took a look at Cloudflare's multi modal playground and played with some models.
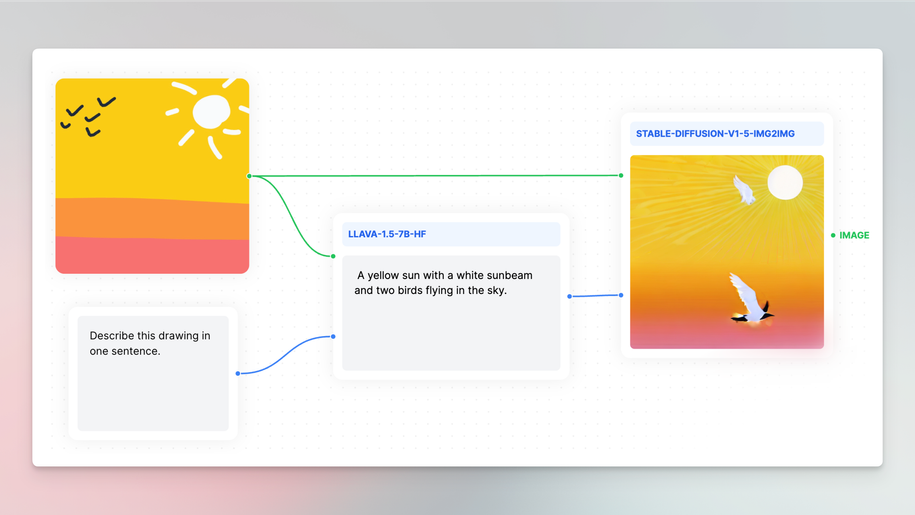
This guided me to the following models:
- LLaVA for the alternative text generation
- Stable Diffusion IMG2IMG for the alternative drawing generation
Image Alternative Text
To generate the alternative text for the user drawings, we use the LLaVA model.
Let's see our current /api/upload route:
export default eventHandler(async (event) => {
  // Make sure the user is authenticated to upload
  const { user } = await requireUserSession(event)

  // Read the form data
  const form = await readFormData(event)
  const drawing = form.get('drawing') as File

  // Make sure the drawing is a jpeg image and is not larger than 1MB
  ensureBlob(drawing, { maxSize: '1MB', types: ['image/jpeg'] })

  // Create a new pathname to be smaller than the last one uploaded (for a desc ordering)
  const name = `${new Date('2050-01-01').getTime() - Date.now()}`
  // Store the image in the R2 bucket with the `drawings/` prefix
  return hubBlob().put(`${name}.jpg`, drawing, {
    prefix: 'drawings/',
    addRandomSuffix: true,
    customMetadata: {
      userProvider: user.provider,
      userId: user.id,
      userName: user.name,
      userAvatar: user.avatar,
      userUrl: user.url,
    },
  })
})
The LLaVA model is expecting a Uint8Array of the image and a prompt to generate the alternative text:
const { description } = await hubAI().run('@cf/llava-hf/llava-1.5-7b-hf', {
  prompt: 'Describe this drawing in one sentence.',
  // Convert the drawing from File to Uint8Array
  image: [...new Uint8Array(await drawing.arrayBuffer())],
}))
We can add the description to the custom metadata of the drawing:
export default eventHandler(async (event) => {
  // ...
+  const { description } = await hubAI().run('@cf/llava-hf/llava-1.5-7b-hf', {
+    prompt: 'Describe this drawing in one sentence.',
+    image: [...new Uint8Array(await drawing.arrayBuffer())],
+  }))

  // ...
  return hubBlob().put(`${name}.jpg`, drawing, {
    // ...
    customMetadata: {
       // ...
       userUrl: user.url,
+      description
    },
  })
})
Lastly, we need to update our listing page to display the description in the <img> tag but also in the title attribute so the user can see the description when hovering the image.
<script setup lang="ts">
const { data } = await useFetch('/api/drawings')
</script>

<template>
  <div class="grid grid-cols-1 sm:grid-cols-2 lg:grid-cols-3 xl:grid-cols-4 gap-8">
    <div v-for="drawing in data?.blobs" :key="drawing.pathname" class="flex flex-col gap-2">
      <img
        :src="`/drawings/${drawing.pathname}`"
        :alt="drawing.customMetadata.description"
        :title="drawing.customMetadata.description"
      />
      <!-- ... -->
    </div>
  </div>
</template>
Let's see the result:
Alternative Drawing
To generate a new drawing based from the drawing and the alternative text, we need to use the Stable Diffusion IMG2IMG model.
await hubAI().run('@cf/runwayml/stable-diffusion-v1-5-img2img', {
  image: imageAsUint8Array,
  prompt: imageAltText,
  guidance: 8,
  strength: 0.5,
})
It takes the following inputs:
image(asUint8Array) to use as a reference for the image generationpromptto guide the model in generating the imageguidanceto control how closely the generated image adheres to the given text promptstrengthto control how much the model changes the input image, with higher values creating bigger changes.
Let's update our /api/upload route to generate the alternative drawing and store it our R2 bucket.
export default eventHandler(async (event) => {
  // ...

  const aiImage = await hubAI().run('@cf/runwayml/stable-diffusion-v1-5-img2img', {
    prompt: description || 'A drawing',
    guidance: 8,
    strength: 0.5,
    image: [...new Uint8Array(await drawing.arrayBuffer())],
  })
    .then((blob: Blob | Uint8Array) => {
      // Convert Uint8Array to Blob
      if (blob instanceof Uint8Array) {
        blob = new Blob([blob])
      }
      // Store the image in the R2 bucket with the `ai/` prefix
      return hubBlob().put(`${name}.png`, blob, {
        prefix: 'ai/',
        addRandomSuffix: true,
        contentType: 'image/png',
      })
    })

  // ...
  return hubBlob().put(`${name}.jpg`, drawing, {
    // ...
    customMetadata: {
      // ...
      aiImage: aiImage.pathname,
    },
  })
})
As you can see, we store the pathname of the AI generated image in the custom metadata of the drawing.
Now, we can display the AI generated image in our listing page when hovering the user's drawing:
<script setup lang="ts">
const { data } = await useFetch('/api/drawings')
</script>

<template>
  <div class="grid grid-cols-1 sm:grid-cols-2 lg:grid-cols-3 xl:grid-cols-4 gap-8">
    <div v-for="drawing in data?.blobs" :key="drawing.pathname" class="flex flex-col gap-2">
      <div
          class="group relative max-w-[400px]"
          :title="drawing.customMetadata.description"
        >
          <!-- User drawing -->
          <img
            :src="`/drawings/${drawing.pathname}`"
            :alt="drawing.customMetadata.description"
            class="w-full rounded aspect-1"
            loading="lazy"
          >
          <!-- AI generated image, displayed on hover -->
          <img
            :src="`/drawings/${drawing.customMetadata?.aiImage}`"
            :alt="`AI generated image of ${drawing.customMetadata?.description}`"
            class="w-full rounded aspect-1 absolute inset-0 opacity-0 group-hover:opacity-100"
            loading="lazy"
          >
        </div>
    </div>
  </div>
</template>
I am quite happy with the result:
Conclusion
This is the end of this tutorial on how to use Cloudflare AI models in a Nuxt application. I hope you enjoyed it and that it gave you some ideas on how to use AI for improving accessibility, SEO or User Experience.
Feel free to expand on this foundation and add your own unique features to make Atidraw yours!
If you prefer, you can also deploy this project on your Cloudflare account by clicking on the button below:
Happy coding & drawing!
Start with NuxtHub today
How to use Libsodium in Cloudflare Workers
Learn how to leverage NaCL to crypto box seal values, useful when working with GitHub repository secrets.
Code, Draw, Deploy: A drawing app with Nuxt & Cloudflare R2
Let's walk through the process of creating Atidraw, a web-based drawing application built with Nuxt and using Cloudflare R2 for storage.